Yes, this is your last chance to upgrade to SSL or face the consequences The recent versions of browsers make it clear that the net is set for SSL and they are not going to put up with non-https sites. There will be user-experience disasters as well as ranking penalties and the time to make your WordPress site run on https is like yesterday! — No ifs and buts about it.
But really, how do you do that in the first place? Well, it’s easy. Here are 7 steps to make sure you are on top of things. Let’s get started.
1. Why do you need SSL / HTTPS at all?
- SSL is an SEO ranking factor for Google: Sometime in 2014 Google announced that they will start using HTTPS as a ranking factor to rank your website in search results. That’s one reason you want to install an SSL certificate on your website and get a ranking boost.
- SSL sites load faster: Protocols like SPDY (deprecated in favor of) and HTTP2 speed up the pageload time of your website. But they require HTTPS protocol.
- Faster pageload speed is an SEO ranking factor: Of course this gives you another ranking boost since faster pageload speed is a ranking factor again. If you want, compare the pageload times of a non-http and https enabled page loaded with multiple scripts, stylesheets, images etc.
- Newer versions of major browsers throw warning signs when the site is not on SSL / HTTPS: Chrome and now the recent update of Firefox throw a warning when people enter data into forms when on in-secure sites.
- Verbose non-HTTPS warnings will scare away your customer: It’s about sales and sales about trust. Whether it’s a newsletter signup or an online-purchase, these eerie warnings will throw the customer off balance. And rightly so. Why? See the next point.
- SSL encryption protects your customer (and you) from snooping and man-in-the-middle attacks: When you are logging into a site your username and password are sent from your browser to the website’s server. There are chances that someone could be monitoring this communication and collecting this information and obviously they have the capability to store, leak and misuse this information. The same happens when you are making an online-purchase and submit your payment details on the site. Do you even want to leave a chance that this info might be leaked and misused?
- It’s not an option. There’s no ifs no buts. It is a must. 2017 is an year which will usher the web into SSL. It will also sound the death-knell to mark the end of general
httpusage. You don’t want to be left behind.
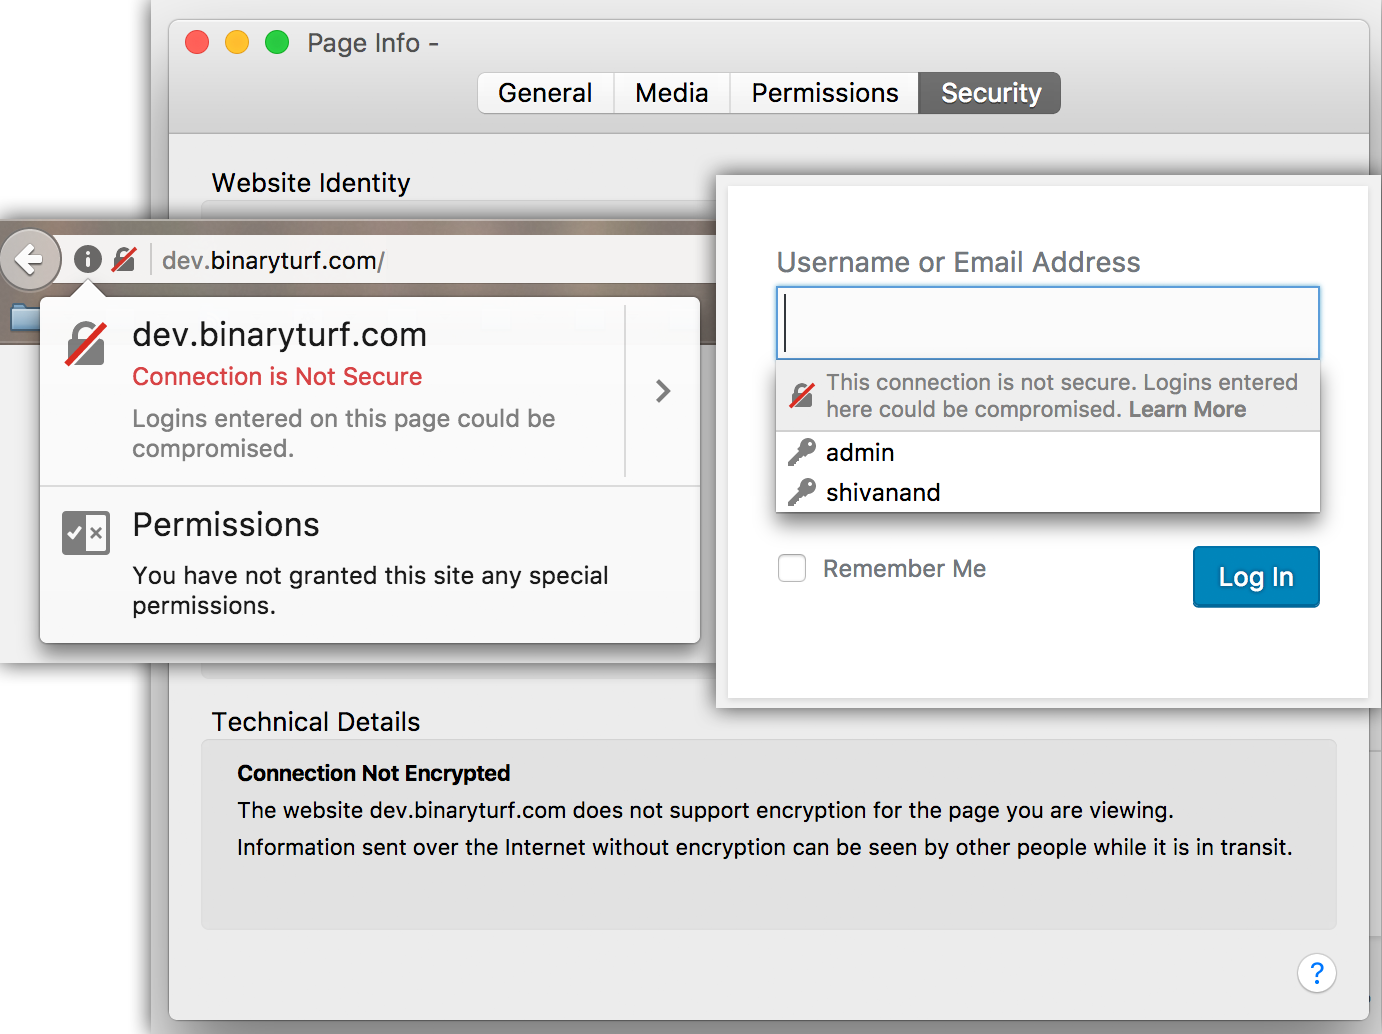
2. What kind of user-experience is it without HTTPS?
In short here’s a picture of what it looks like in the various areas of Firefox.
3. Installing SSL certificate
Basically there are two way to install an SSL certificate
- Ask your website host to install it for you
- You do it yourself: if you are on an un-managed hosting or have God powers on the server and understand jargon like sudo apt-get yum vim httpd.conf etc., chances are that you wouldn’t be reading this article.
Once you hear from that that SSL certificate is installed, proceed to the next step.
4. Getting ready to make WordPress work with SSL and HTTPS
Before you configure WordPress, it’s time to make sure that the hosting is actually ready for serving WordPress over SSL. To do that we need to verify if regular files are accessible over https. To do this, you can load any non-WordPress file on your server, but instead use https in place of the regular http.
To test you can use https://<your wordpress directory>/license.txt this file is bundled with WordPress by default and loading this file will not trigger WordPress. Rather it will give you an opportunity to verify if the site is ready for using the https protocol.
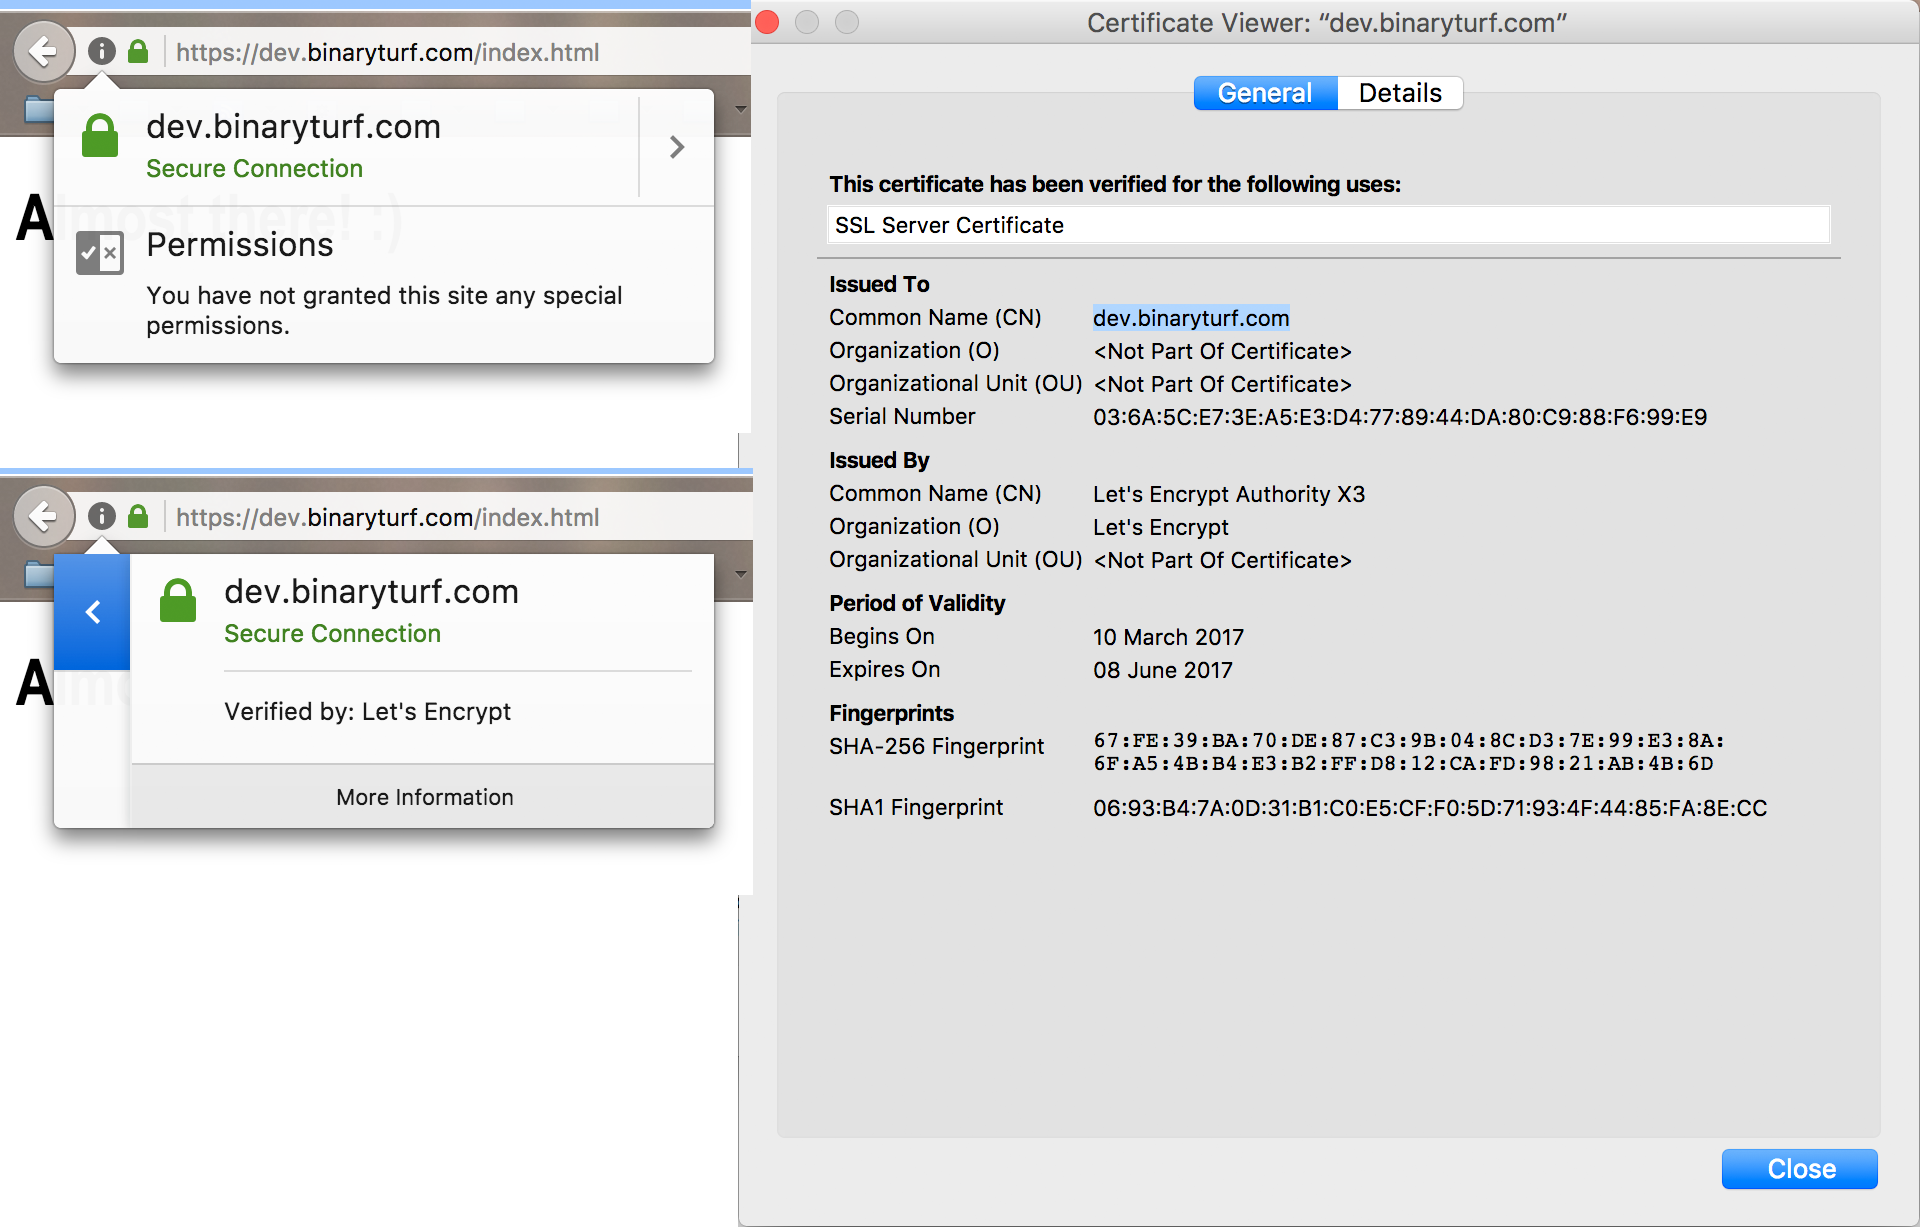
- Verify the green lock icon in the address bar. Click it.
- Click on the arrow towards the right edge of the popup.
- Click on “More Information”
- Verify the “Expires On” date under “Period of Validity”.
- Set a reminder that you have to renew the SSL certificate before that date. Else it will expire and the site will start throwing a warning.
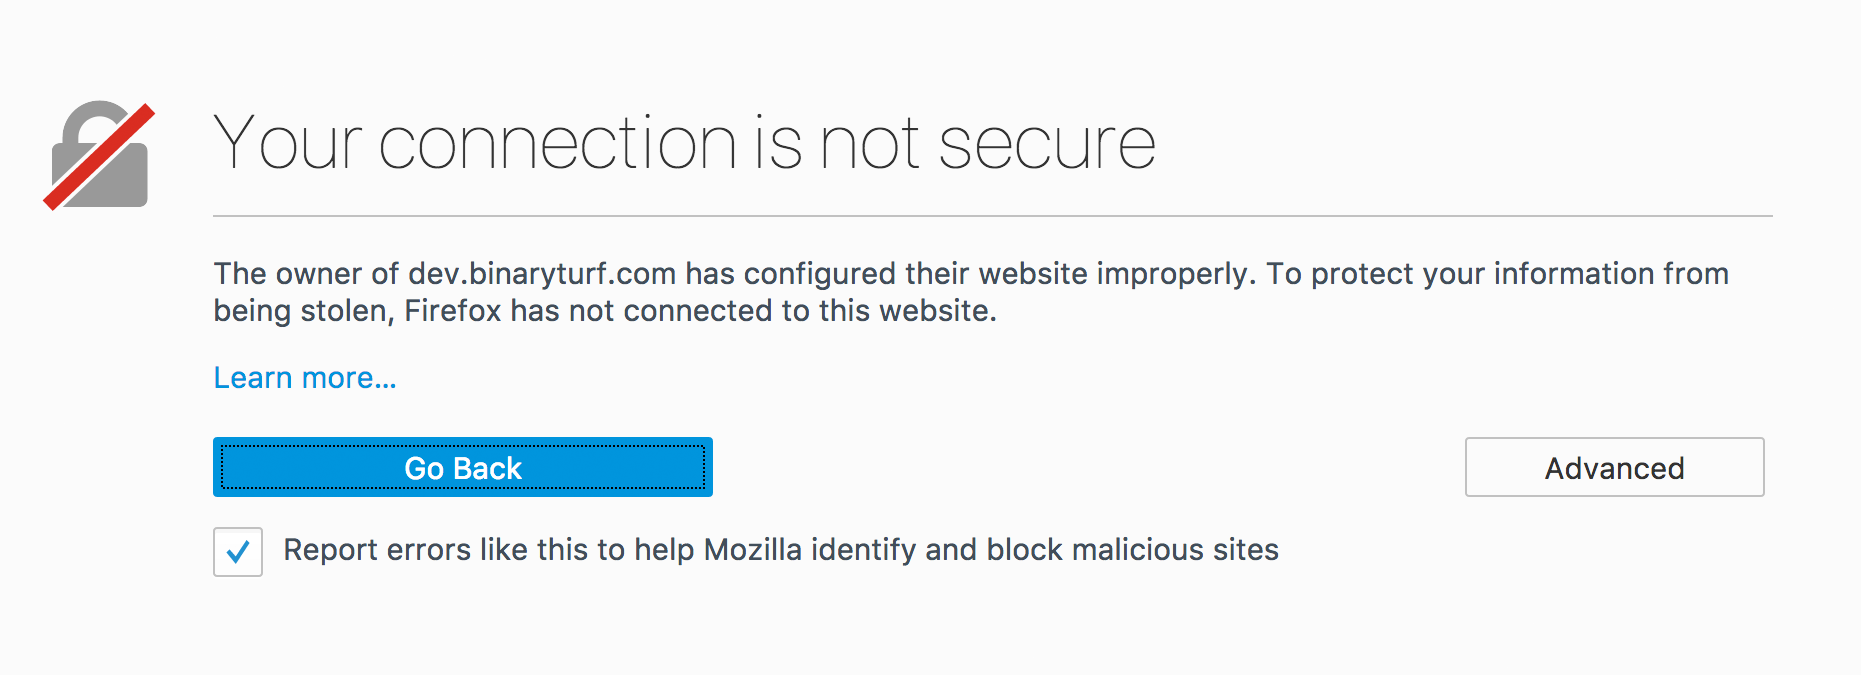
You may also see an error like this in case things are not set right. If so, call-up or chat with the hosting support to have it fixed right away.
If all is green, violla! We’ll make WordPress sing on https.
5. Making WordPress use the https protocol
- Let’s install the Really Simple SSL plugin.
- Activate the plugin and proceed. Warning: This will log you out of WordPress and show the login screen again. Make sure you remember your login credentials.
- After logging in, the Really Simple SSL plugin will have a notice on the dashboard that it requires you to activate SSL functionality. Once you do, the plugin would make sure that the site is using the https protocol in the url.
- I’d say you go to your WordPress Dashboard > Settings > General and update the WordPress Address (URL) and the Site Address (URL) to include the https protocol anyway. Sadly this will log you out again. But it’s better that core WordPress knows that it’s going to be using https. Will save a lot of headaches in case the plugin gets disabled etc. in the future or while troubleshooting.
- Verify that the WordPress site is working fine on the front-end. Verify the green lock icon in the URL bar above. There should be no exclamation signs or warnings being thrown. In case you still get warnings about insecure or mixed content, that means links, images or some script / style on the page is still using http. It could be from a theme or a plugin and a thorough troubleshooting session is in order. Ping me if you need help diagnosing. All can be see from the page’s source code. But it will also vary from page to page.
- edit the .htaccess file in the WordPress installation directory and add this as the first line:
Header set Strict-Transport-Security "max-age=31536000" env=HTTPS
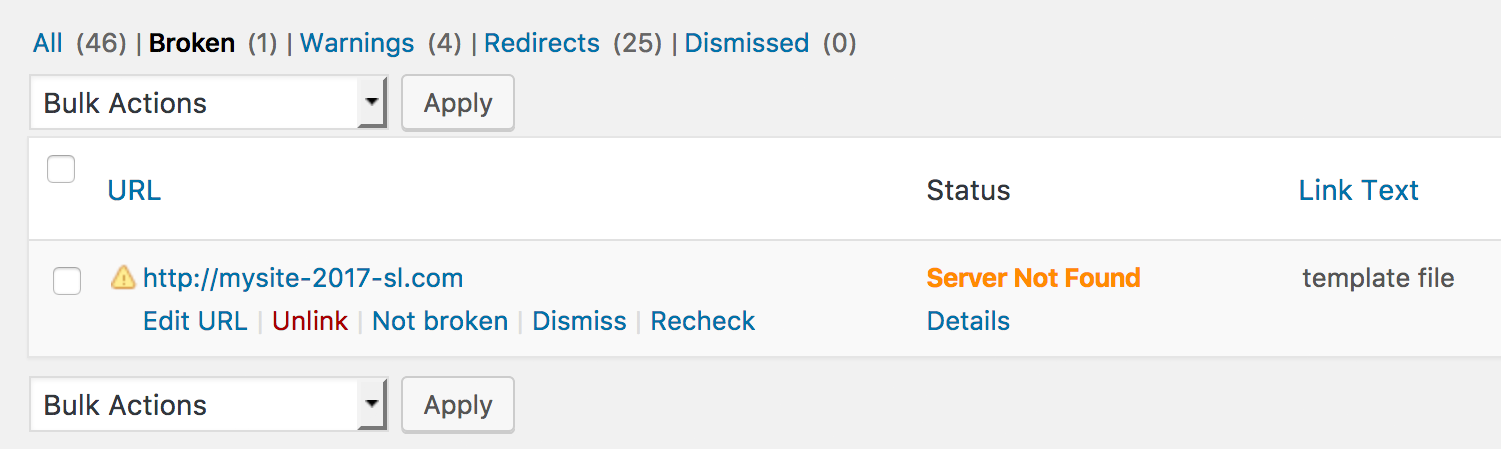
6. Check for broken links
The Really Simple SSL plugin changes all the links on your site to use https. But this can pose a problem for links to external sites that are still not on https. So it helps to check the links and allows you to remove the link or edit etc. It’s a very handy tool to keep up the user-experience.
7. Making sure the internet knows about your HTTPS WordPress website
This is a critical step. You’ll need to add the https url of your website to Google Search Console, Google Analytics, Bing Webmaster Tools. You need to make sure that you are linking to the https version of your website on your Facebook / Twitter profiles and everywhere else on the net… all other platforms that needs integration / Amazon listing… aweber email signature and all.
After a hectic session of working with your WordPress, the green lock icon on the address is sure to put a smile on your face. But if all this looks just too much, I’m here to help. Just drop me a message and I’ll make sure your WordPress website works on HTTPS.
Related Links:
