Every site needs a landing page. And while there are specific themes that allow you to insert call-to-action buttons inside the WP Editor, this post is about Genesis-specific implementation of landing pages.
There are several ways you can implement landing pages in Genesis. And if you hire a developer, they typically charge based on the number of landing page templates etc. If they do it manually for each page, it adds up to the charges and thus they have to quote high. If they do it with a plugin then the landing pages are as smart as the plugin’s capability.
Landing pages are never done and finished. Designing and deploying landing pages is just the start of your campaign. After the landing page goes live, it will need to be tweaked every week for the first month and then may be every other week or once a month thereafter. This goes on till you are satisfied about the performance of the landing page.
Thus the real challenge is not in designing the landing page but in the ease of deployment, ease of maintenance, ease of tweaking and ease of testing to verify performance. If you are a developer or designer working for high-end clients, you have to get this right. If you are a client, ask your developer about it.
Here are some ways landing pages can be built in Genesis.
-
The Caveman’s Way
If you are game for reinventing the wheel, things are pretty straight. You dive into the code and hook the section manually. As for the content, you can keep it in the code. You can use any one of the Genesis actions hooks to insert the section(s). Some of the hooks you can use are:
genesis_beforeThe first thing inside the <body> tag.genesis_before_headerRight above the header area.genesis_after_headerAfter the header area.genesis_before_content_sidebar_wrapBefore the Genesis content-sidebar-wrap.genesis_after_content_sidebar_wrapAfter the Genesis content-sidebar-wrap.genesis_before_footerRight before the Genesis footer.genesis_after_footerAfter the Genesis footer.genesis_afterThe second but last element in the <body> tagwp_footerThe last element in the <body> tag.
The downside of this method is that you have to dive into code. Managing content is difficult and code is not the ideal place to have the content. You could do the same as above with a landing page template. But the fact remains that it’s crude. My suggestion — If you know what you are doing, go ahead!
-
The Rookie’s Way
Want a landing page that is easy to edit? Just hook up an extra widgetized area. This is pretty much like the point above, except that the widgetized areas are user editable. That’s the way a lot many do it. And it works as long as you just have one or two landing pages at the max. Because beyond this point there’s just too many widgets to manage and when you come back after a week to tweak the copy you wouldn’t know which one’s where.
- Register The Widget Areas For The Backend: Use the following code to register the sidebars at the backend so they show up under the Appearance > Widgets screen.
add_action( 'widgets_init', 'myns_register_sidebars' );                    // The right action-hook to initiate your sidebars is widgets_init

function myns_register_sidebars() {
    genesis_register_widget_area( array(
            'name' => __( 'After Header', CHILD_DOMAIN ),                  // The name of this widget area
            'id' => 'after-header',                                        // The id of the widget area
            'description' => __( 'After-header Widgets.', CHILD_DOMAIN )   // The description that will show in the backend.
        ) );
}
In the above code you can do as many calls to
genesis_register_widget_areaas the number of widget areas you need. Now we’ve registered the widget areas, but they won’t show up on the front yet. - Show Them At The Frontend At The Right Place Now use the following code to show the widgetized areas(s) on the front-end:
add_action( 'genesis_after_header', 'myns_sidebar_after_header' );         // Change to the relevant hook where you want to output the widgets

function myns_sidebar_after_header() {
    if ( is_active_sidebar( 'after-header' ) ) {                           // If we have widgets in this widget area
        echo '<div class="after-header"><div class="wrap after-header">';  // initiate a full-width section with a wrap inside
            genesis_widget_area( 'after-header' );                         // Output the actual widget area
        echo '</div></div>';                                               // Close the full-width section and the wrap
    }
}
The point is that it gets the landing page up and running, looking right and is also editable. The challenges of testing and fine-tuning still remain a challenge though.
- Register The Widget Areas For The Backend: Use the following code to register the sidebars at the backend so they show up under the Appearance > Widgets screen.
-
Genesis Dambuster Plugin
The Dambuster plugin is free and it allows you to force the content inside the post editor to break out of the regular content column and go full-width. The plugin is free and also allows you to show or hide several other aspects of the page or the post like toggling the header, menus, footer, footer widgets etc. The Dambuster plugin is essentially a wonderful solution that allows you to turn any post or a page into a landing page.

One down side of the Dambuster plugin is that it only works with the content inside the post-editor.
-
Lander Framework
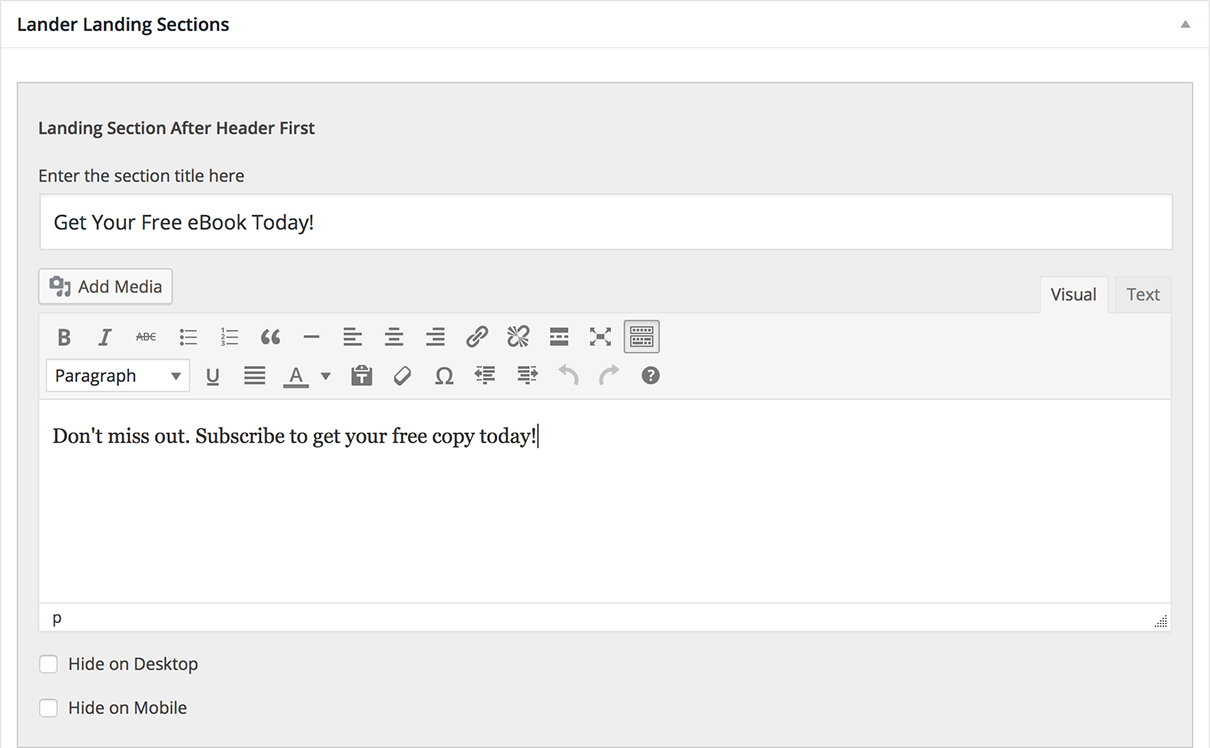
Lander Framework is a professional theme framework that allows you a great deal of flexibility and comes with a set of robust and intelligent features. So there’s no installation of 7 different plugins to get the purpose served. And when it comes to landing pages, there’s perhaps nothing that does it as elegantly as Lander. Lander allows you to insert full-width landing page sections below the header and above the footer on per page and per post basis. By default there are three below the header and three sections above the footer.
Here are the main highlights of the landing sections in Lander:
- Full-fledged Editor: Each landing section has a full fledged WordPress editor so the content for each landing page stays local to the page.
- Multiple, Independent Sections: Just like a landing page has multiple sections, Lander allows you multiple independent sections to work with. This ensures that you don’t erroneously edit the wrong data.
- Desktop vs Mobile Control: Each section can be shown specifically on Desktop or Mobile or both viewports. This actually helps you target desktop and mobile users independently. Studies have shown that mobile visitors have different interaction patterns than desktop visitors. This means for landing pages that really convert, you must have specific sections for desktop and mobile users. This will help you optimize the landing page for each type of visitor category.
- Easy A/B Testing What do you do when you want to run some A/B tests on a landing page? Since you can show or hide each section independently, you can run your tests with one copy of the section and duplicate the copy into another section, tweak it and continue the second phase of the experiment. This will tell you which copy performs better.
- Unlimited Sections You can have an unlimited number of these sections, each with it’s own WordPress editor. This means you are not limited to using one single section where you have to make the entire pitch.
- No countless widgets to confuse you: The typical style of theme authors is to give you widgetized areas for landing pages. These widget areas sit in the WordPress Admin > Widget’s screen along side the After Entry, Primary Sidebar, Secondary Sidebar and three or four widgetized sections in the footer if you have them. Add to this three or four widgets for your homepage or landing pages. And now you have around eleven or twelve widget areas to manage. What if you have 5 landing pages? You’ll be forced to use conditional tags to show only the widgets that are relevant to the specific page. Lander keeps the Widget Screen pollution to a minimum.
- Any Layout: Combine the power of Genesis column-widths with Lander’s landing page sections and you have countless layout possibilities. You can have two halves or three thirds or one third and two-thirds — anything at all. Lander Landing Sections play well with Genesis column classes.
- Bottom Line — They Convert: With some testing and tweaking it’s very easy to get the landing pages to start giving the desired results.
- Bells & Whistles: Just like the Dambuster plugin, you can show or hide header, breadcrumbs, menus, page title, entry widgets, footer widgets and the footer itself. You can do these independently for Desktop and Mobile viewports.
If you are looking for a performer, this is it.
The truth is that every site needs landing pages. And if you are a developer, you have to choose a solution that allows you to do things smartly and without reinventing the wheel. This is specifically true for marketers who specifically provide landing page optimization services. Time for deployment, testing & optimization and finally the time it takes to get and assess the results will vary depending on the solution you choose. And despite the method that you chose to implement the landing pages, the real proof of the pudding lies in how they affect your conversion rates. If any of these helps, there’s no price that is too high.
